Knowing how to measure GPU clearance in a PC case is the skill that stands between a smooth build and a graphics card that physically will not go in — a more common heartbreak than it should be, because modern cards have grown long, thick, and tall while case specifications quote their clearances in inconsistent ways. The card has three dimensions that matter, the case has three corresponding maximums, and the connectors and cables need room that neither headline number mentions.
This guide defines exactly what to measure on both sides of the fit — card length, height, and thickness in slots; case clearances with fans and radiators installed — and how much margin to leave so ‘fits on paper’ becomes ‘fits in the case, cables and all’.
Disclosure: As an Amazon Associate, ilcastellomenu.com earns from qualifying purchases. Product examples below link to Amazon, where you can check current availability and specifications; this guide itself lists no fixed prices because pricing and bundles change frequently.
How to Measure GPU Clearance in a PC Case: The Three Dimensions
A graphics card is a box, and it must fit in all three dimensions at once. Length runs from the mounting bracket at the rear of the case toward the front panel — the dimension that collides with front fans, radiators, and drive cages. Height (sometimes called width in listings, confusingly) runs from the motherboard’s PCIe slot upward toward the side panel — the dimension that collides with the panel once power cables are plugged into the card’s top or end. Thickness is measured in expansion slots: how many slot positions the card’s cooler occupies, which decides whether the slots and space below it remain usable.
Which numbers to trust
Manufacturers list card dimensions on the product’s specification page; use those, not retailer summaries, and note whether the length includes the bracket (it usually measures the card body) and whether the height includes any protruding shroud, backplate lip, or decorative element. Reviewers’ physical measurements are a useful cross-check for flagship cards. The case’s side of the bargain is its stated maximum GPU length, CPU-cooler height (a separate check), and its slot count — all in the case specifications, and all defined differently by different brands, which the next sections untangle.
If you are still at the choosing stage, this measurement discipline is one part of the wider checklist in How to Choose a PC Case.
Tools for the job
A steel tape measure or a rigid ruler, and the card’s and case’s spec pages. For an existing build, you will measure the empty space in the case directly; for a planned build, you will compare documents — and documents demand more margin, because you cannot see the cable that will occupy the last few millimetres.
In this guide
Measuring Length: Bracket to Front Obstruction
In an empty case, measure from the inside face of the rear panel — where the card’s bracket will sit — straight forward to the first obstruction on the card’s line: usually the back of a front fan, a radiator, or a drive cage. That distance is your true available length. Compare it with the case’s stated maximum GPU length; the two should roughly agree, and where they do not, your physical measurement wins.
Now the adjustments that eat the paper clearance. A front radiator plus its fans can consume several centimetres of the stated maximum, which case makers sometimes quote with the radiator absent. Power connectors that exit the end of the card (rather than its top) need their connector length plus a gentle bend radius for the cable — budget a few centimetres for that run. Cards destined for high-end builds are the usual victims of optimistic arithmetic, which is why the roundups behind Best PC Cases for Rtx 3080 exist: they record which cases genuinely swallow flagship-length cards with cooling hardware fitted.
Measuring Height and the Side-Panel Problem
Card height is measured from the PCIe slot’s line to the card’s highest point. The case’s corresponding limit is the distance from the motherboard plane to the inside of the side panel, minus what your power cables need. This is where builds fail quietly: the card fits with the panel off, the 12VHPWR or 8-pin connectors plug into its top edge, the cable’s bend rises above the card — and the panel will not close, or closes by pressing on the cable, which no connector should endure.
The discipline is simple: when comparing heights, add the connector and its minimum comfortable bend to the card’s height before judging the case. Right-angle adapters and cables exist, but treat them as solutions to apply knowingly, not as assumptions in your arithmetic. In small cases this dimension vetoes more builds than length does; the size trade-offs are surveyed in What is a Good PC Case Size.
Measuring Thickness in Slots
Count the case’s expansion slots and the card’s slot occupancy together. A card listed as 2.5 or 3 slots thick hangs below its own slot into the space of the slots beneath; in a case where the power-supply shroud sits close under the motherboard, a thick card’s fans can end up millimetres from the shroud, starving its intake. Check the vertical distance from the card’s slot to the shroud or case floor as part of thickness: the card needs breathing room below its fans, not merely a slot to occupy.
Thickness also decides what else can live in the system — a capture card, a sound card, extra storage controllers all need slots the graphics card’s cooler may already be shadowing. Plan the whole slot map, not just the graphics card’s own position.
Margin: How Much Is Enough?
For length, a few millimetres is a fit and a centimetre is a comfortable fit; below a few millimetres, manufacturing tolerances on both products can erase your clearance entirely. For height with top connectors, margin is measured in cable-bend comfort, not millimetres of card. For thickness, margin is airflow: if the card’s fans will sit almost against a shroud or another card, temperatures will tell you the fit was only theoretical.
When the numbers come out marginal, the honest options are a longer or taller case, a shorter card variant (most GPUs exist in several partner designs of different sizes), or a different cooling plan for the front of the case. What not to do is order and hope: graphics cards are awkward and expensive to return, and ‘it might fit’ is not a measurement. Builders comparing case sizes for exactly this reason will find Full Tower vs Mid Tower Case a useful companion.
A Worked Routine for a Planned Build
One: from the card’s spec page, record length, height, and slot thickness, noting connector position. Two: from the case’s spec page, record maximum GPU length and confirm the slot count, then subtract front cooling hardware you will actually install from the length figure. Three: add connector-and-bend allowance to the card’s height if its connectors are on top, and compare against the case’s internal height where published — or choose a case with published GPU height guidance from its maker. Four: check the slot map for shroud clearance and other cards. Five: if any dimension lands within a few millimetres, change a component on paper. Paper is where fit problems are cheap.
Measuring in an Existing Build (Upgrade Scenario)
When the card is an upgrade to a PC you already own, measure the machine, not the documents. Power down, unplug, and open the case. Measure from the rear panel’s inside face, along the slot the new card will occupy, to the first obstruction — and measure at the card’s height, since a drive cage or cable bundle may intrude at one height and not another. Then measure the vertical: from the slot line down to the shroud or floor (the new card’s fans need that air) and up to the side panel, remembering the power connector’s claim on the top space.
Also measure your current card before removing it and compare with its published dimensions: the difference teaches you how your case’s real geometry compares with its paper geometry — knowledge that makes the new card’s published numbers far more trustworthy as a prediction.
Vertical Mounts, Riser Cables, and Other Geometry Changers
A vertical GPU mount rotates the whole problem: the card’s length now runs vertically against the case’s height, its fans face the side panel, and the critical clearance becomes the gap between the card’s fans and that panel — too tight, and the card suffocates decoratively. Measure that gap with the same discipline: the card needs open air in front of its fans, not merely physical room for its body.
Support brackets and anti-sag stands belong in the measurement conversation too: a long, heavy card installed horizontally will sag at its far corner over time, and a bracket occupies space in the slot map below. Budget the bracket when you count thickness, and check that the card’s installed, supported position — not its theoretical one — is what your clearances describe.
Clearance for the Rest of the Build
The graphics card gets its own guide because it fails most often, but the same measurement discipline protects the whole parts list, and a builder who has learned it here should apply it everywhere. CPU cooler height against the case’s stated maximum, with the side panel’s inner lining (some silent cases carry foam that consumes millimetres) counted. Radiator plus fan thickness at the top against the motherboard’s top edge and memory height. Power supply length against the drive cage or cable space behind it. Front radiator thickness against the graphics card length you just verified — the two checks share the same centimetres and must be done together, never independently.
Write all of them on one page before ordering anything. Compatibility is a system of simultaneous equations, and the page is where they are solved — cheaply, in pencil, instead of expensively, in returns.
When the answer is 'it fits, but only just'
A build that fits with millimetres to spare deserves one more question: does it service? A graphics card that can be installed but not removed without extracting the CPU cooler first, a power connector that can be plugged in but never inspected, a side panel that closes only by pressing a cable — these are fits that tax every future cleaning and upgrade. Where a choice exists, prefer the combination that fits with working room. The build day is not the only day you will put your hands in this case, and clearance is also the space your future self works in.
Clearance Traps in Popular Build Patterns
Certain fashionable build patterns manufacture clearance traps, and forewarned is forearmed. The front-radiator gaming build subtracts its radiator and fans from GPU length in exactly the cases whose marketing photos show the longest cards — always run the combined arithmetic. The small-case-with-big-card build lives or dies on height-plus-connector, not length, because compact cases are narrow before they are short. The vertical-mount showcase build converts the question into fan-to-glass distance, a number no specification sheet prints.
The pattern beneath the patterns: clearance failures happen at interfaces between two components’ territories. List the interfaces in your build — card-to-radiator, card-to-panel, cooler-to-memory, radiator-to-motherboard — and measure each one deliberately. Builds fail at interfaces, and interfaces are exactly what a checklist is for.
Recording and sharing measurements
When you have measured a real case, write the numbers where the next builder can find them: in your build notes, in a forum post, in the case’s review comments. Manufacturer figures for clearance are inconsistently defined across the industry, and the community’s measured data — ‘this case takes a 340 mm card with a front fan, 315 with a radiator’ — is often more trustworthy than the spec sheet. Contributing your measurements repays the builders whose notes saved your own build, and it disciplines your method: a number you intend to publish gets measured twice.
Clearance and Resale: Measuring for the Next Owner Too
A final, practical reason to keep your measurements: graphics cards and cases both change hands, and the seller who can state verified dimensions sells faster and returns less. When you list a card, its measured length, height, and slot thickness — not the marketing name of its cooler — are what a careful buyer needs. When you list a case, its measured internal clearances, taken with a tape rather than copied from a spec sheet of unknown conventions, are a genuine service to the next builder.
Keep the numbers with the hardware’s box or manual. The measurement habit this guide teaches compounds: every build you document makes the next build’s arithmetic faster, and the community’s pool of real measurements — the pool your own build quietly relied on — grows by exactly your contribution.
The thirty-second version
For the builder in a hurry, the whole guide compresses to this: card length plus front-hardware subtraction, card height plus connector and bend, card thickness plus breathing room below, all compared against the case’s real remaining space, with a centimetre of honesty in the length. Thirty seconds of arithmetic, performed before the order, is the difference between a build day and a returns process. Measure twice, order once.
The Fourth Dimension: Power Connector Clearance and Cable Bend
The three dimensions in this guide’s opening have a modern companion that catches more builders than any of them: the space above the card, where its power connectors live. Current high-end cards draw power through connectors mounted on the card’s top edge or end, and those cables are not free to bend at the plug. The connector’s housing, the plug’s latch, and the cable’s minimum bend radius together claim a run of vertical space beyond the card’s stated height — space that a side panel, especially a glass one, may not be willing to give. A card can pass the height test on paper and fail it the moment its power cable is fitted and the panel refuses to close without pressing on the bend.
Measure for it explicitly. Take the card’s height, then add the connector’s projection and a gentle bend’s worth of cable — the cable makers’ own guidance is to let the first stretch of cable run straight from the plug before it curves — and compare the total against the distance from the card’s mounting plane to the inside of your side panel. If the panel closes by flattening the cable’s first centimetres, the build is borrowing against the connector’s health, and connectors under constant side-load are a known failure story of this hardware generation. The honest solutions are geometric: a wider case, a card whose connectors sit recessed or at the end, a right-angle adapter from a reputable maker fitted exactly as its instructions demand, or a vertical mount that moves the whole problem to a different face.
Older multi-plug cards have the same physics in a milder accent: two or three conventional connectors in a row, each with its own bend, each wanting its cable to leave downward rather than be folded against the panel. Measure the row, not the single plug, and route the cables as a loom with slack distributed along it. The panel should close with the same indifference it shows an empty case; any panel that needs persuading is a measurement you got wrong, delivered as feedback.
Reading Manufacturers’ Numbers: Why Two Honest Specs Disagree
Builders are often confused by a card that exceeds its own listed length or a case whose clearance figure seems to have been written about a slightly different case, and the confusion is usually definitional rather than dishonest. Card length is quoted by different makers from different landmarks: some measure the shroud’s full extent, some the circuit board’s, some include the rear bracket’s tab and some stop at the bracket’s face. A card with a decorative shroud overhanging its board can be longer than its electronics and shorter than its photograph, and the only figure that matters — the longest rigid extent, bracket face to shroud tip — is the one you must reconstruct from reviews, from other builders’ measurements, or from the maker’s engineering drawings where they publish them.
Case clearance figures have their own dialects. The stated maximum card length may assume the front fan removed, or a radiator of a particular thickness, or nothing at all in the front bay — and the honest makers say which, in a footnote, in a manual, in a PDF you have to want to find. When the headline figure and your tape disagree, believe the tape and demote the headline to advertising. The worked routines earlier in this guide exist precisely because the two spec sheets, card and case, were written by different companies in different conventions, and the builder is the only person who will ever reconcile them — with a tape measure, before the money moves.
A useful habit: when a measurement matters to within a few millimetres, collect it three ways — the maker’s figure, a reviewer’s measured figure, and the community’s build logs for that exact card in that exact case — and plan against the least flattering of the three. Precision you borrow from three sources is sturdier than precision promised by one.
Clearance That Shrinks: Radiators, Fan Stacks, and the Build’s Own Growth
The clearance you measure in an empty case is the largest it will ever be. A front radiator takes its thickness from the card’s length budget, its fans take theirs, and a push-pull stack takes both twice — the arithmetic is pitiless and routinely forgotten by builders who measured the case bare and the card hopefully. Work the stack on paper before ordering: case’s internal length, minus radiator, minus fan bank, minus the second fan bank if planned, leaves the card’s true allowance, and that remainder — not the case’s headline figure — is the number the card must fit. Tubes need their share too: a radiator’s fittings and the first bend of its tubing live in the same front zone, and a card that fits the metal may still fight the plumbing for the corner.
Growth continues after the build. The capture card added next year takes a slot and an airflow gap; the second bank of fans arrives with the hotter upgrade; the chunky cable loom of a new power supply dresses itself along the card’s end. A build planned at exactly its clearance limit is a build with no future, which is why the margin guidance in this guide should be read as growth allowance rather than caution. The builders who never re-measure are the ones who left room the first time.
When the stack genuinely cannot fit, the options in order of sanity are: a thinner radiator or a top mount instead of front, fans on one side only, a shorter card variant — most flagship models exist in several partners’ designs of differing length — and only lastly a larger case, because the case is the one component whose replacement rebuilds the entire machine. Measure the stack twice and the case purchase happens once.
Sandwich Layouts and Console Cases: Clearance in the Flat World
Small form factor cases that arrange the card behind the motherboard on a riser — the sandwich layout — and the flat, console-style cases that lay the card along the board both rewrite the clearance questions. Length and height trade places depending on orientation, thickness becomes the dimension that decides whether the card’s fans can breathe at all, and the riser cable adds a fixed fold of hardware whose position the card must respect. In these cases the maker’s compatibility list is worth more than usual — many publish tested card dimensions per layout — because the interactions are too specific for generic arithmetic: a card that fits the volume may still foul the riser’s fold, the spine’s cut-out, or the power supply’s cable exit.
Breathing clearance is the sandwich layout’s tax. The card’s intake face sits close to a panel or to the motherboard’s back, and the gap — sometimes only millimetres by design — is the card’s whole air supply, supplemented by the panel’s perforations. Measure the gap your specific card leaves, because card thickness varies by model and cooler design, and a thicker variant of the same card can halve the airway its thinner sibling enjoyed. Temperatures in these builds are a clearance measurement wearing a disguise, and the fix, when the gap is too tight, is a different card variant or a different layout — not a faster fan.
Console-style cases add gravity’s vote: the card often hangs or stands in orientations where its weight works on the slot and the riser continuously. Support, in the form of the case’s own brackets fitted exactly as designed, is part of clearance here — a card that sags in a flat case can sag into its neighbour or its own fan shroud’s clearance. Fit the supports, then measure; the order matters because the supported position is the true one.
Two Cards, One Case: Spacing, Capture Cards, and Air Gaps
A second expansion card — a capture card, a network card, a second graphics card for compute or displays — converts clearance from a fitting question into a spacing question. The graphics card’s fans need a free slot’s worth of air beneath them as a minimum working gap; a neighbour card fitted flush against the fans turns the lower half of the cooler into a wall, and the card’s temperatures will explain the geometry at length. Measure the slot layout on the board, not the case: the case offers slots the motherboard may not populate at full speed or at all, and the physical gap between your card’s fans and the next card’s back is the number to write down.
Where the gap cannot be had, the alternatives are placement and plumbing: the neighbour moves to the lowest slot the board offers, the graphics card moves up a slot if the board’s layout and the case’s rear openings allow, or the build accepts a thinner neighbour — some capture and network cards are low-profile by design. What not to do is fit the neighbour and trust the card’s fans to cope; a starved cooler does not fail loudly, it simply runs hotter and louder for years, and the owner blames the card for the slot’s decision.
This is also where case choice echoes forward. A case with generous rear slot count and a motherboard with a thoughtful slot layout give a build room to host its future; the compact build that uses every slot on day one has spent its expansion on arrival. Clearance, again, is not only about whether today’s card fits — it is about whether the machine can grow without a transplant.
Moving the Machine: Clearance, Sag, and Transport
The day a PC travels — a house move, a LAN event, a trip to a technician — its clearances become loads. A long, heavy graphics card is a lever bolted at one end, and a car journey’s bumps work that lever against its slot and its support with a persistence no desk ever applies. The transport rule used by system builders is simple: for any journey beyond a careful carry across a room, the graphics card comes out, travels in its own padded box — the one it arrived in, ideally — and is refitted at the destination. Five minutes with a screwdriver is cheaper than a slot torn from a board or a card’s connector cracked at the board’s edge.
If the card must travel fitted — a sealed show unit, a machine you cannot open — then support becomes the whole game: the sag bracket fitted and snug, any shipping brace the case or system builder provided reinstalled, the case transported in the orientation that loads the card least, which for most layouts is lying on its motherboard side so the card’s weight presses into the slot rather than hanging from it. Foam or inflatable packing inside the case, sold for exactly this purpose, immobilises the card and the tower cooler together; it is the professional’s answer and it is inexpensive.
On arrival, the clearances get one fresh look before power: card seated fully, support still snug, no cable worried loose into a fan’s path. Machines rarely die of the journey itself; they die of the small displacement nobody checked. Your tape measure’s work was finished at the build — this last check is its epilogue, done by eye and by hand, every time the machine has travelled.
Clearance for the Cooler and the Rest of the Tall Hardware
The graphics card monopolises this guide, but the tape measure’s other appointments deserve a consolidated pass, because builds fail on their second-tallest component with some regularity. The processor’s tower cooler is the usual runner-up: its height is measured from the board’s surface, the case’s stated cooler clearance is measured from the same plane to the panel, and the two figures meet with the side panel’s inner liner, glass standoff, or cable bulge waiting to steal the last millimetres. Measure from the board, include any fan you intend to mount proud of the cooler’s fins — a common trick to clear tall memory, which spends cooler height to buy memory clearance — and treat a fit with no margin as a fit that the first cable dressed behind the tray will argue with.
Memory and its lighting, drive cages in older layouts, the tops of water blocks and their fittings — each has a tallest point and a neighbour it can foul, and the build that checks them all on paper is the build that assembles once. The habit this guide is really teaching is not about graphics cards at all: it is that every component publishes three dimensions, every case publishes the space between its walls, and the builder who reconciles the two sets of numbers in advance is the builder whose Saturday goes as planned.
A Pre-Purchase Routine You Can Run in Five Minutes
Gather the whole method into a drill. One: write the card’s three dimensions from the most pessimistic source you can find, and add the power connector’s projection and bend to the height. Two: write the case’s three clearances, demoting any figure that assumes parts removed you intend to keep, and subtract the front stack you actually plan — radiator, fans, fittings. Three: compare dimension by dimension, demanding the margins this guide specifies, and treat any dimension that passes by less than the margin as a fail to be solved, not a risk to be taken. Four: if the build already exists, measure the physical space with the tape at the card’s actual mounting plane, because an existing build’s cables and cages have already spent some of the paper clearance. Five: photograph or save the figures with the build’s records, so the next upgrade starts from evidence.
Run the drill out loud, on paper, even when — especially when — the answer looks obvious. Clearance failures are almost never knowledge failures; every builder who has ever sworn at a card that would not fit knew about clearance. They are routine failures: the check that was surely fine, the figure that was surely comparable, the radiator that was surely thinner. The drill is the difference between knowing and doing, and five minutes is the cheapest the lesson is ever sold at.
When the Numbers Say No: The Graceful Alternatives
Sometimes the drill’s verdict is that the card and the case cannot be reconciled, and the quality of a builder shows in how gracefully they accept it. The alternatives, ranked by how much of the plan they preserve: the same card in a partner’s shorter or slimmer variant, which keeps the performance and changes only the cooler; a different mounting — vertical, or a front stack rearranged — that moves the conflict to a dimension with room; a case transplant, expensive in effort but total in effect, which at least has the courtesy to solve every future clearance question at once; and, last and occasionally wisest, a different card, when the desired model’s dimensions are simply from a larger world than the machine you own.
What the graceful alternatives share is that they are chosen on paper, at the cost of an evening’s re-planning. The ungraceful version — the card forced, the panel sprung, the cable folded against its will — is also chosen, just later and at higher prices. Measurement’s whole purpose is to hold the decision at the cheap end of that timeline, and a no from the tape measure, however unwelcome, is the tape measure doing the kindest work it knows how to do.
Gear for This Guide
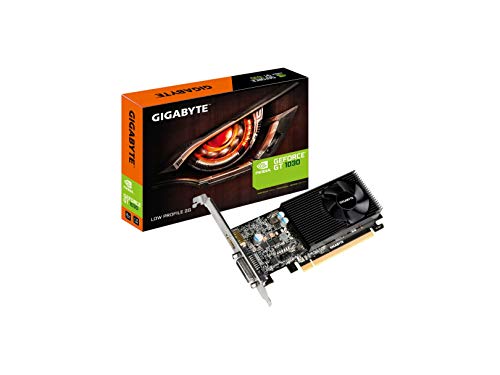
Two verified components at opposite ends of the clearance problem: a low-profile card that fits almost anywhere, and a 168mm-tall cooler reminding you the CPU has a clearance check of its own.

GIGABYTE GeForce GT 1030 Low Profile Graphics Card
A low-profile, short card — the class of GPU you choose when a compact case’s length and height numbers veto everything else. GIGABYTE GeForce GT 1030 Low Profile Graphics Card — Check on Amazon
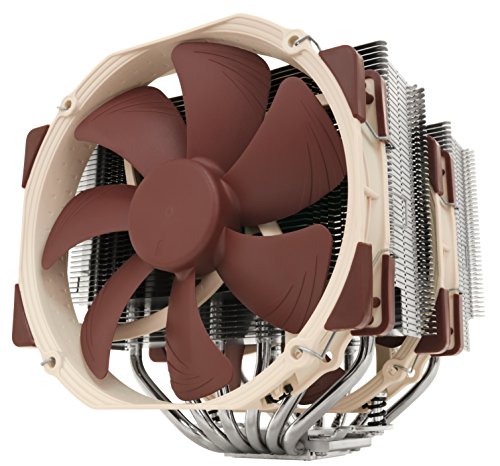
Noctua NH-D15 CPU Cooler
At 168mm tall per its listing, this cooler is the parallel measurement: GPU clearance gets the attention, but cooler height vetoes just as many builds. Noctua NH-D15 CPU Cooler — Check on Amazon
Frequently Asked Questions
Where exactly do I measure GPU length from?
From the inside face of the rear panel where the card’s bracket mounts, forward to the first obstruction — fan, radiator, or cage. On the card, use the manufacturer’s stated length for the full card body. Compare those two numbers, then subtract anything you plan to install in front of the card.
The case says my card fits, but the power cable stops the panel closing. Why?
Because case clearance figures describe the card, not the card plus its connector and cable bend. Top-mounted power connectors rise above the card’s stated height. Add the connector and a gentle bend radius to the card’s height before judging any case, especially a narrow one.
How much length margin is safe?
A centimetre is comfortable; a few millimetres is a genuine fit that tolerances could still embarrass; less than that is a gamble. Remember to subtract front radiators and fans from the case’s headline figure first — that subtraction is where most paper fits fail.
Does card thickness matter beyond slot count?
Yes: a thick card’s fans need open space beneath them. If the power-supply shroud or case floor sits immediately below, the fans are starved even though the card ‘fits’. Thickness also consumes the slots other expansion cards might need, so plan the whole slot map.
My card is 1–2 mm too long. Can I make it fit?
Sometimes the obstruction is removable — a drive cage or an unused front fan position — and sometimes a front fan can move. But never force a card, bend it against a radiator, or leave it pressing on components. If the honest measurement says no, a different card variant or case is the correct answer.
The card fits by length but blocks half the front fan. Is that acceptable?
It is common and usually acceptable, with a condition. The blocked portion of the fan serves the card itself — the air it would have moved arrives at the card’s intakes by the shortest possible path — so the system often loses little. The condition is the rest of the path: the remaining intake must still feed the processor’s zone, and the card’s own exhaust must still clear. Test temperatures under a combined load rather than reasoning from the photograph; a build that looks obstructed and tests cool is an honest build, and the reverse is true as well.
Should I measure clearance with the front radiator already installed?
Yes — that is the only measurement that describes your build. The case’s headline figure describes an empty box, and every component you add to the front stack spends from it. If the radiator is not yet bought, measure the empty case and subtract the radiator and fan thicknesses from the maker’s drawings, then subtract a working margin for fittings and tube bend. Builders who measure the bare case and hope are the source of most length failures, and the failure always announces itself at the worst moment: card in hand, build half done.
Is graphics card sag a clearance problem?
It is a clearance problem in slow motion. A sagging card’s far end drops below its designed plane, which can close the gap to the card or shroud beneath it, stress the slot, and in extreme cases let a fan’s blades kiss a neighbouring surface. Measure and fit support at build time — a bracket, a stand, or the case’s own support — and re-check the sag at the annual clean, because supports loosen and heavy cards settle. The card should sit as level in year three as it did in week one, and keeping it there is maintenance, not vanity.
A seller lists a card’s length shorter than the maker’s site. Which do I trust?
Neither, until you know what each measured. Sellers copy figures between variants, makers quote different landmarks for different regions’ listings, and the card in the box is the only authority. Ask for the measurement that matters — bracket face to the shroud’s furthest point — or find a review that measured the physical card with calipers, a figure the specialist press increasingly publishes for exactly this reason. When the purchase turns on a few millimetres, the effort of one message or one review is the cheapest insurance in the build.
Can I install a card diagonally if it is slightly too long to go in straight?
The manoeuvre exists — cards are often offered in at an angle and rotated into place — and it legitimately rescues builds where the card fits its final position but not the straight path into it. Two cautions keep it honest. The card must fit its seated position with the margins this guide specifies; a diagonal entry does not create clearance, it only borrows manoeuvre room. And the rotation must be possible without force against the motherboard, the front fans, or the card’s own fans and shroud — if anything must flex to let the card pass, the answer is not technique but a different card or case.
Do case makers measure clearance from the same place I should?
Not always, which is the quiet engine of most clearance disputes. Some quote from the rear of the case’s interior, some from the motherboard’s edge, some from behind the front fan mounts — three different zeros for the same ruler. Your zero is the card’s own bracket face, because that is where the card’s length begins when it is seated. If a maker’s figure cannot be reconciled to that zero from their manual’s diagram, treat the figure as approximate and let your tape, or a build log for the exact pairing, have the final word.
Should I trust a case’s stated clearance if my card is a special edition?
Trust it less the more special the edition is. Limited and flagship partner variants carry the largest coolers in a card family’s range, and their dimensions are the ones most often copied wrongly between listings. Verify a special edition’s three dimensions from its own maker’s page — not the reference model’s — and then run the drill as usual.
The Bottom Line
Measure the card as a box — length, height, slots — measure the case as the space that remains after your cooling hardware is installed, add the connectors and their bends, and demand a centimetre of honesty in the length. Do it on paper and the build day holds no surprises.
Related Guides
Fold clearance into the full case checklist and compare the tower sizes that change it: