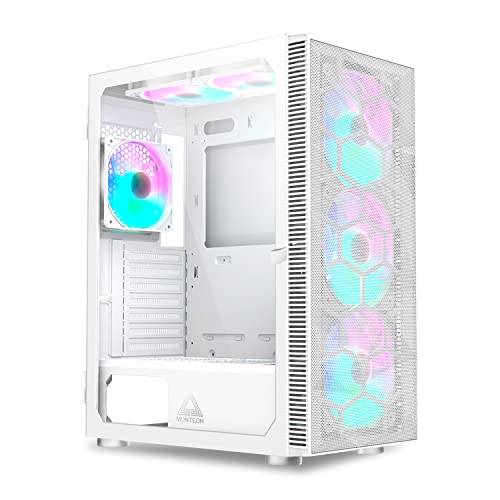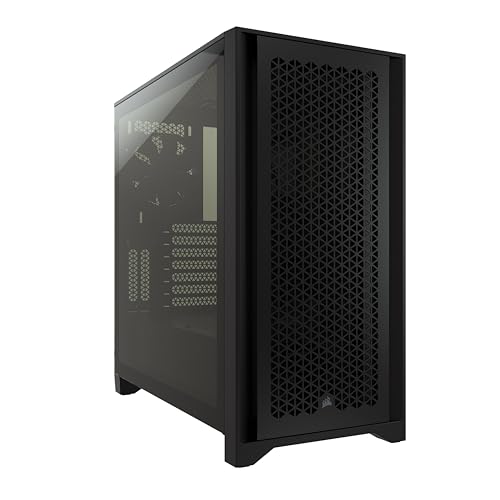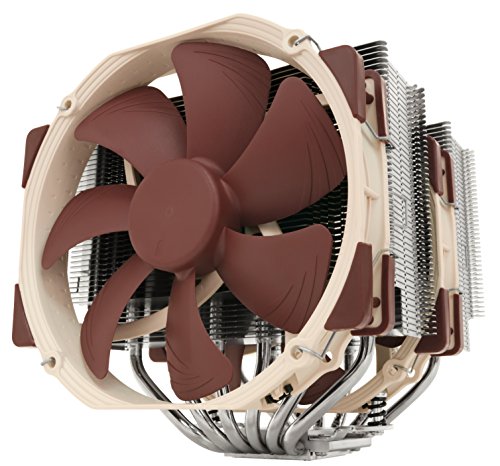
Learning how to choose a pc case is really learning to check five compatibilities in the right order, because a case is the one component every other component must physically fit inside. Motherboard size, graphics card length, cooler height, power supply format, and radiator support decide whether your build assembles at all; airflow design and build quality decide how well it runs and how pleasant it is to build in; looks decide only how you feel about the box under your desk.
This guide works through the decision in build order: form factor first, then the three clearance checks, then cooling and airflow, then the quality-of-life features that separate an easy build from a frustrating one. Follow it and the case stops being a gamble and becomes a checklist.
Disclosure: As an Amazon Associate, ilcastellomenu.com earns from qualifying purchases. Product examples below link to Amazon, where you can check current availability and specifications; this guide itself lists no fixed prices because pricing and bundles change frequently.
How to Choose a PC Case: Compatibility Before Looks
Every case decision starts with the motherboard. Cases are built around the standard board sizes — from largest to smallest, E-ATX, ATX, Micro-ATX, and Mini-ITX — and a case supports its own size and usually everything smaller. Match the case to the board you own or plan to buy, and be careful with E-ATX: boards carrying that label vary in width, and ‘E-ATX support’ in a case can mean full mounting or merely that the board physically fits with some standoffs unused.
Sizing the case to the build, not the ego
Bigger cases are easier to build in and offer more expansion room, but they cost more, weigh more, and dominate a desk or floor space. Smaller cases demand planning — cable routing, component order, cooler choice — but reward you with a compact machine. The honest middle for most builders is the mid tower, and the reasoning about sizes is laid out in What is a Good PC Case Size.
Decide where the PC will live before choosing: a case on a desk needs its dimensions checked against the desk (and its weight against the desk’s capacity), while a floor case needs clearance around its intakes so carpet and walls do not strangle its airflow.
The three clearances that veto cases
Graphics card length, CPU cooler height, and power supply length are the three measurements that most often veto an otherwise perfect case. Case specifications list maximums for each; component specifications list their actual dimensions; compare them with a few millimetres of margin, because cables exiting a graphics card and cooler mounting tolerances eat space that headline numbers ignore. The graphics-card measurement in particular deserves its own careful method, given in How to Measure GPU Clearance in a PC Case.
In this guide
Cooling and Airflow Design
A case is a wind tunnel you build yourself. Its job is to move cool air in across the components and hot air out again with as little obstruction as possible. The front panel is the biggest design variable: open mesh fronts breathe freely, while solid fronts with side vents restrict intake to varying degrees — sometimes acceptably, sometimes badly. Fan mounts (how many, and in which sizes, at front, top, and rear) tell you the ceiling of the airflow you can build.
What to check in the specifications
Look for: included fans and their positions (a case with two or three decent fans included is a head start), dust filters on the intakes (which you will clean, per How to Clean a PC Case — a sibling guide in this series), radiator support if liquid cooling is even a future possibility, and clearance behind the motherboard tray for cables, because a case whose side panel bulges with wiring is a case whose airflow and your patience both suffer.
The physics behind these checks — pressure balance, intake versus exhaust, why hot air’s path matters — is explained in PC Case Airflow Explained. Read it once and case specifications become much easier to judge.
Airflow versus silence versus looks
Case design trades three goods against each other: maximum airflow, minimum noise, and appearance. Mesh-fronted designs breathe best; solid, damped designs run quietest; glass-fronted designs show off the build at some cost to intake. There is no free lunch, only informed choices — the panel-material side of this trade is compared head-to-head in Tempered Glass vs Mesh Case.
Build Quality and Building Experience
You will spend hours with your hands inside this box, and you may reopen it for years of upgrades and cleaning. Steel thickness shows up as panel flex and resonance; thumbscrews, hinged or tool-less side panels, and removable dust filters show up as minutes saved every maintenance session. Check how the side panels attach and come off — you will do it more often than you expect.
Cable management is the quality feature builders feel most: rubber-grommeted routing holes beside the motherboard, tie-down points, Velcro straps, and enough depth behind the tray to close the panel without sitting on it. Cases designed around this are collected in Best PC Cases for Cable Management, and they are worth studying even if you buy something else, because they show what good routing provision looks like.
Front I/O and Everyday Conveniences
The front panel connectors are your daily interface with the machine: check that the case offers the USB ports you actually use, including USB-C if your motherboard has the header for it — a case port without a motherboard header is decoration. Power and reset button feel, headphone jack placement, and whether the front I/O sits on top or the front face all matter according to whether the case lives on the floor or the desk.
Drive bays have shrunk in importance as storage moved to M.2 and 2.5-inch SSDs, but if you run 3.5-inch hard drives, confirm the cage count and whether the cage is removable for airflow or longer power supplies. Optical bays survive in few modern designs; external drives have taken that role.
Budget Tiers, Honestly Framed
Without naming prices: entry-tier cases cover the compatibilities and basic airflow, with thinner steel and fewer conveniences. Mid-tier cases — where most builders should shop — add better included fans, real cable management, filters, and sturdier panels. Higher tiers bring premium materials, extensive radiator support, refined panel mechanisms, and quieter stock operation. Spend first on compatibility and airflow, then on build experience, then on appearance: a beautiful case that suffocates a graphics card is a bad case wearing a good costume.
First-time builders in particular should weight the building experience heavily, because a forgiving case teaches good habits; forgiving options are gathered in Best PC Cases for Beginners.
The Pre-Purchase Checklist
Run this list against any candidate. Motherboard size supported, with E-ATX width verified if relevant. Graphics card maximum length exceeds your card plus connector margin. CPU cooler maximum height exceeds your cooler. Power supply format and length fit, with room for its cables. Fan and radiator mounts match your cooling plan. Intakes are filtered. Cable-routing depth behind the tray is adequate. Front I/O matches your motherboard’s headers. The case’s external dimensions fit its intended home with airflow clearance. Pass all nine and the case will serve the build — and its next two upgrades — well.
Reading a Case Specification Sheet Like a Builder
A case’s spec sheet mixes the numbers that matter with numbers that merely fill the page, and reading it well is a learnable skill. The load-bearing figures are: motherboard support (with E-ATX width if relevant), maximum graphics card length, maximum CPU cooler height, maximum power supply length, radiator support by position (with thickness where stated), fan mounts by position and size, and the external dimensions. Everything else — window material, lighting controllers, included hubs — is secondary until those seven check out.
Two reading traps deserve naming. ‘Radiator support’ may assume fans of standard thickness and a motherboard whose top edge does not intrude — a thick radiator plus fans at the top can foul tall memory or the board’s heatsinks in cases whose clearance is tight. And graphics card length may be quoted with front fans removed or a drive cage extracted. Where a build is anywhere near a limit, look for the maker’s own compatibility notes or measured reviews rather than trusting the headline figure.
Front Panel, Dust, and the Room the PC Lives In
Choose the case for the room it will actually inhabit. A PC in a carpeted, pet-friendly home needs aggressive, accessible filtration more than it needs a third radiator mount; a PC in a clean, hard-floored office can trade filter convenience for other virtues. A PC that will live in a hot room or a sunlit corner needs airflow headroom that a cool basement setup never will. A PC in a bedroom needs its noise behaviour considered at purchase, not discovered at midnight.
This is why the ‘best case’ question has no context-free answer, and why this guide insists on a checklist over a ranking: your room, your parts, and your habits are three of the specifications, and no reviewer can supply them for you.
Matching the Case to the Build's Future
A case outlives the build inside it, so choose it partly for the builder you will be in three years. If your upgrade pattern is a new graphics card every few years, protect length clearance and power-supply wattage headroom in the case’s layout. If you suspect a move to liquid cooling, buy the radiator mounts now — they cannot be added later. If your storage keeps growing, keep a case with bays in contention even if today’s build uses one SSD.
The counterweight is honesty about patterns that never arrive. Most builders never install the second radiator, the fourth drive, or the E-ATX board they bought volume for. Look at your last two builds rather than your ambitions: the case that fits the demonstrated pattern, with one size of headroom in the dimension you actually upgrade, is the case that serves longest.
Where to see cases honestly
Product photography flatters everything, so gather evidence from sources that show the unglamorous angles: build logs with cables routed, reviews that measure temperatures and noise with the panels on, and the maker’s own manual, whose exploded diagrams reveal routing holes, clearances, and panel mechanisms more truthfully than any render. A case whose manual you have read is a case you actually know. Given that this component will be opened, cleaned, and rebuilt for years, an hour of this homework is the best-spent hour in the whole parts list.
Specialist Cases: When the Checklist Changes
Three build types rewrite parts of the standard checklist, and recognising them early prevents buying a generalist case for a specialist job. A home-server or NAS build in a PC case cares about drive bays, drive cooling, and vibration damping above all — its graphics card may not exist, and its ‘airflow path’ serves a stack of spinning disks. A showpiece build inverts the usual priorities: panel transparency, interior presentation, and lighting infrastructure come first, with thermals engineered around them deliberately rather than accidentally. A workstation for quiet professional use — audio, video editing in a shared space — promotes the noise rows of the checklist to the top and treats damping as a compatibility, not a luxury.
The second-PC effect
Households with more than one PC should also choose cases as a fleet. Matching panel mechanisms, filter designs, and fan sizes across machines halves the maintenance learning curve and lets spare fans and filters serve every build. It is a small consideration that never appears in reviews, and it is the kind of thing that separates a parts list from a household system. Your future self, cleaning two PCs on the same Saturday with the same routine, will appreciate the foresight.
The Test Fit: What to Do in the First Hour
When the case arrives, treat its first hour as an inspection, not a celebration. Check the panels for transit damage and confirm they remove and refit cleanly. Test-fit the motherboard tray with the board or its cardboard template before installing anything, and dry-run the graphics card’s length against the front of the case with your intended fan or radiator in place — the combined measurement this series keeps insisting on, verified now while returns are painless. Route one power cable from the supply’s position to the board’s farthest connector to confirm the case’s internal distances suit your supply’s leads.
A case that passes its first hour will not surprise you in its fiftieth build hour. A case that fails it goes back in its box the same day, with your build schedule intact — which is exactly what the inspection is for.
Keeping the case's documents
File the case’s manual and its accessory box — spare screws, standoffs, brackets, the alternative panels some models include — somewhere findable. Cases outlive builds, and the second build always needs the standoff bag the first build’s owner threw away. The manual’s clearance diagrams, consulted at upgrade time, answer in seconds the questions that otherwise require opening the case with a tape measure. Small disciplines, long dividends.
Choose Around the Loudest Component You Own
Case advice usually starts with airflow, but a quieter starting point is your loudest component, because the case’s job description changes with what it must contain. A graphics card whose fans spin hard under load, or whose coil whine sings at high frame rates, asks for a case that puts distance and material between the card and your ears — a solid or damped panel on the ear side, a layout that does not aim the card’s exhaust at the room, and enough airflow headroom that the card’s fans can run slower for the same temperature. A near-silent build of efficient parts asks for almost nothing, and can live happily in a showcase that would cook and amplify a flagship card.
Inventory your build’s noise honestly before shopping. The CPU cooler, the graphics card, the power supply, and any hard drives each have a voice; the case can muffle, redirect, or expose them, but it cannot silence a component at war with its own cooling. If one part is dramatically louder than the rest, the cheapest acoustic upgrade is often that part’s fan curve or its replacement — a truth worth facing before paying a case premium to hide it. Our comparison of airflow and silent case designs works through the trade-off in full once you know which voice you are designing around.
Placement completes the acoustic picture. A case on the desk sits at ear height and arm’s length, where every decibel is personal; the same case under the desk gains the desk itself as a baffle and a metre of distance, and suddenly a mesh front’s openness stops mattering. Decide where the machine will live before deciding what it must be made of — the room is part of the case’s specification, and it is the only part you cannot return.
Where the PC Lives Decides the Case: Desk, Floor, and Living Room
Measure the machine’s home with the same care as its components. Under a desk, the case’s width competes with your knees and its height with the desk’s underside and any drawer unit; the side you open must be the side you can reach, which decides whether a windowed panel shows your build or shows the wall. On the desk, the case becomes furniture at eye level: its depth steals monitor space, its front panel is a daily interface, and its looks stop being a preference and become a room decision. In a living room, the case joins the media furniture, and the questions turn domestic — does it read as an appliance, does its lighting have an off switch that truly turns it off, and can its fans be tuned to disappear under a film’s quiet scenes?
Each home also vetoes features. A floor-standing case in a carpeted room needs feet that lift its bottom intake clear of the pile, or a stand. A desk-standing case needs its window on the correct side for the desk’s position against the wall — a surprising number of beautiful builds face their glass into the room’s corner and their blank steel at their owner. A living-room case needs front connectivity you can reach from the sofa’s side of the room, or a household agreement that the wireless peripherals are the interface and the case is a cupboard with a power button.
Write the placement into the shortlist criteria before the component criteria. Builders shop for the build they have; the case must also fit the room it will actually sit in, and a case that wins on compatibility and loses on placement will be re-bought within the year — the most expensive outcome in the whole comparison.
Buying a Case Second-Hand: What to Inspect
Cases are among the safest components to buy used — no silicon to degrade, no firmware to brick — and among the easiest to buy badly, because their failures are omissions. Inspect for the small things that are expensive to replace. The accessory box matters most: motherboard standoffs and their screws, drive sleds and caddies, spare thumbscrews, the alternate panels or brackets some designs ship with. A case missing its sleds and standoffs is not a bargain; it is a parts hunt, and some proprietary sleds are effectively unobtainable. Ask for the box, and count its contents against the manual, which the maker publishes online.
Inspect the structure next. Check the motherboard tray for stripped standoff threads and the panel mounts for bent tabs — the scars of a previous build done in a hurry. Run every included fan by hand: a bearing that feels gritty or a blade that wobbles is announcing its retirement. Check filters for tears and the front panel’s connectors for bent pins, and confirm the power button and front USB ports work if you can test them, because front-panel faults are the classic used-case disappointment and the least repairable part of the design.
What wear does not matter: dust, which washes; minor scratches on steel, which vanish under a desk; a missing decorative badge. The used case’s economics are excellent when the skeleton and the small parts are complete — you are buying folded steel and engineering, both of which age gracefully — and the inspection above, fifteen minutes with a torch and a checklist, is the entire price of admission.
Cables, Power Supplies, and the Ecosystem Inside the Case
A case is also a cable-length decision, and the pairing that humiliates builders is the large case with a standard power supply: the CPU power cable, routed honestly behind the tray, arrives a few centimetres short of its socket, and the build stalls on a Sunday evening. Large and tall cases need longer cables or extensions for the motherboard’s top-edge connectors; compact cases punish the opposite sin, leaving nowhere to fold a non-modular supply’s surplus. When you shortlist a case, check its stated cable-routing provisions against your supply’s type — modular supplies forgive almost any case, fixed-cable supplies forgive almost none — and budget the build’s patience accordingly.
The power supply’s own placement has quietly standardised around the shrouded basement, which tidies the window view and gives the supply its own air supply through the case floor. That arrangement asks two things of the buyer: a floor the case can breathe through, as the placement section notes, and a supply whose fan orientation the case’s venting supports. It also hides the supply’s label, where its specifications and warranty information live — photograph it before installation, a two-second act that future troubleshooting will thank you for, in this case as in the desk guides’ paperwork habits.
Finally, count the case’s cable-management provisions as a system, not a feature list: tie points where the runs actually go, a channel deep enough for the thickest cable with the panel closed, and grommets or cut-outs aligned with the motherboard’s edges rather than with the designer’s symmetry. You will open that rear panel for years, and the difference between a case that manages cables and a case that merely hides them is measured in how you feel at minute forty of an upgrade.
Reading Case Reviews Like a Builder, Not a Spectator
Case reviews measure real things, but their methods decide what their numbers mean for you. Thermal tests are run with standardised hardware at standardised loads, which makes cases comparable to each other and only approximately predictive of your build: your graphics card’s cooler design — whether it exhausts into the case or out of it — can move a case’s ranking more than the case’s own design does. Read the test system’s specification as carefully as the results, and weight most heavily the reviews whose hardware resembles yours in class and cooler style.
Noise testing hides a similar subtlety. Reviews increasingly normalise — adjusting fan speeds until systems match on noise, then comparing temperatures, or the reverse — and the two methods crown different winners. A case that wins at full fan speed may be the case you would never run at full speed; the normalised result is usually the one that describes your evenings. When a review offers both, trust the one that matches how you intend to live: fixed quiet fans, or maximum cooling and the headphones on.
And read the build-along sections, which reviewers write as colour and builders should read as data. The complaints that recur — a sharp edge in the cable channel, a panel that needs three hands, a radiator that fits only with the fans in a specific order — are the case’s true long-term specification, because you will meet them at every upgrade while the thermal champion’s two-degree advantage visits you only in benchmarks. Our airflow explainer gives you the theory to judge the thermal claims; the build-along tells you whether you will enjoy owning the result.
The Case as a Platform: Planning the Second and Third Build
Most cases outlive the build inside them, and choosing one as a platform rather than as a container changes the shortlist. A platform case has headroom in the dimensions that future parts grow into: graphics card length beyond today’s card, radiator support beyond today’s cooler, a power supply bay that takes the longer units high-wattage builds prefer. It has standards rather than novelties — conventional layouts, widely available fans and filters — because the parts ecosystem of a strange case ages faster than the case does. And it has a build experience you are willing to repeat, since the platform’s whole value is realised on the days you open it again.
The economics follow. A case bought once and used for three builds is three cases’ worth of value, which reframes the budget tiers in this guide: the mid-tier case with genuine headroom routinely out-saves the cheap case replaced at every upgrade and the flagship bought for features one build uses. Judge a platform candidate by asking what would make you replace it — a bigger card, a hotter processor, a new room — and whether the case in front of you survives those specific futures, rather than by imagining it must survive all futures, which is how builders talk themselves into full towers they never fill.
There is a sentimental dividend too, and it is legitimate: a case carried across builds becomes the machine’s identity while everything inside it changes, and the familiarity of its panels and quirks makes each rebuild faster than the last. Builders who find their platform rarely speak of it as a purchase. They speak of it as the workshop — and a workshop, unlike a component, is allowed to be a long-term relationship.
Choosing for Someone Else: Gifts, Family PCs, and First Builds for Beginners
Choosing your own case is an exercise in preferences; choosing for another person is an exercise in predicting theirs, and the priorities reorder. For a beginner’s first build — a child’s, a partner’s, a friend’s conversion from console — the case’s forgiveness matters more than its performance ceiling: generous cable space that hides imperfect routing, clear instructions, captive screws that cannot be lost in carpet, and a layout so conventional that every tutorial video on the internet matches it. The beginner will open this case more often than an expert opens theirs, usually nervously, and a case that welcomes that is a teaching tool.
For a gift, add the constraint that the recipient did not choose to want it yet. Neutral styling outlasts bold styling in other people’s rooms, a window is a bet on their tidiness as well as their taste, and quiet operation is the feature recipients thank you for at month six rather than day one. Include the receipt and the accessory box complete; a gifted case with its parts missing teaches the wrong first lesson about the hobby.
Family PCs — the shared machine in a shared room — want the living-room virtues from the placement section plus one more: buttons and ports placed where the family’s actual users, including the shortest, can reach them, and lighting that can be turned fully off by software the family can find. The right case for someone else is rarely the case you would buy yourself, and recognising that is the whole skill this section exists to teach. If the recipient is a beginner, the shortlists in our beginner case roundup start from forgiveness rather than flair, which is the correct order.
Dust Strategy as a Purchase Decision
Every case makes a dust decision on your behalf, and it is worth choosing deliberately because dust is the tax every PC pays forever. A filtered intake design, run at slight positive pressure as our airflow guide explains, keeps the interior clean for months and concentrates the cleaning into the filters — provided the filters are removable without tools, from the front or the bottom, by an owner who will actually do it. A filter that requires the case to be pulled out and laid down is a filter that will be cleaned annually and resented monthly, so judge filtration by its maintenance path, not by its presence on a feature list.
The room votes on the strategy too. A home with pets, carpets, or a smoker produces dust at a rate that overwhelms fine filters quickly, and such rooms often suit a more open case cleaned briefly and often over a sealed design whose filters clog into an airflow problem. A clean, hard-floored room lets the filtered strategy shine for a year between deep cleans. Match the case’s dust philosophy to your home’s dust reality — the honest variable is not how much dust the case stops on day one, but what state the whole system is in on day three hundred.
While you are inspecting, note where the case expects dust to settle and whether you can reach it: a bottom filter that slides toward the wall the case stands against, a top panel that must be removed to reach the radiator’s dust — these small geographies decide whether the cleaning schedule in our case cleaning guide is a ten-minute routine or a furniture-moving expedition in the case you are about to buy.
Gear for This Guide
Two verified components that make the clearance checks concrete: a tall dual-tower air cooler whose height vetoes shallow cases, and a low-profile graphics card built for the smallest enclosures.
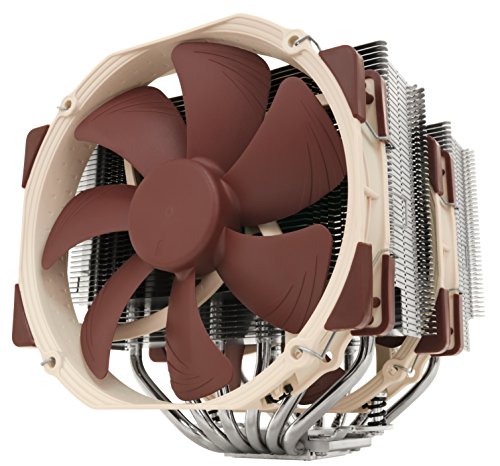
Noctua NH-D15 CPU Cooler
A flagship dual-tower air cooler standing 168mm tall — exactly the class of cooler whose height you check against a case’s CPU-cooler clearance before falling in love with either. Noctua NH-D15 CPU Cooler — Check on Amazon

GIGABYTE GeForce GT 1030 Low Profile Graphics Card
A low-profile card illustrating the opposite end of the size spectrum: cards like this fit compact cases that full-height, full-length cards cannot, at entry-level performance. GIGABYTE GeForce GT 1030 Low Profile Graphics Card — Check on Amazon
Frequently Asked Questions
What size case should a first-time builder choose?
A mid tower, in most cases. It fits a full ATX motherboard, accepts the widest range of coolers and graphics cards, and gives your hands room to work while you learn cable routing. Small-form-factor builds are rewarding but punish inexperience; full towers are more case than most builds need.
How much clearance margin should I leave for a graphics card?
A few millimetres at minimum beyond the card’s stated length, and more if the card’s power connectors exit its end rather than its side, or if a front radiator or fan will share that space. Measure the card including any protruding shroud or backplate overhang, not just the PCB.
Do I need a case with included fans?
Included fans are a convenience and often good value, but the mounts matter more than the bundle: you can always add or replace fans, while you cannot add a fan position the case does not have. Judge a case by its mount layout and panel design first, its included fans second.
Is a mesh front essential for good temperatures?
Not essential, but it is the easiest route: mesh removes the intake restriction question entirely. Solid-front cases with generous side vents can cool well, and solid fronts serve silence-focused builds. What matters is the complete path — intake area, fan layout, and exhaust — not any single panel.
Can I reuse a case for a future build?
Usually yes, and it is one of the best value moves in PC building. Standards for motherboard mounting, power supplies, and drive sizes change slowly. A well-chosen mid tower with good airflow and cable management can serve two or three builds across many years.
How future-proof can a case honestly be?
A case can be future-resistant, not future-proof, and the distinction is in the dimensions. Form factors and connector standards change slowly enough that a conventional, generously sized case usually serves several component generations; what dates a case is not its steel but its assumptions — front ports of a superseded type, no room for the radiators that became standard, a layout built around drive bays nobody fits any more. Choose the case whose assumptions are the most boring and whose clearances are the most generous, and you have bought as much future as the category sells.
Is it worth paying more for a case with a vertical graphics card mount?
Only if you will use it and accept its terms. Vertical mounting displays the card beautifully and, in most cases, parks it close to a glass panel where its fans breathe worse — a trade of temperature for theatre that the card’s cooling must be able to afford. Some cases engineer genuine space behind the card and make the trade fairly; many do not. Decide whether your build is a display piece or a workhorse, check the specific case’s clearance behind a vertically mounted card, and let the answer — not the showroom photograph — decide.
What should I do if my chosen case has poor front connectivity for my needs?
Solve it at the desk rather than replacing the case: a desktop USB hub at the surface, a card reader in a monitor’s hub, or a simple front-panel extension lead routed to where your hands live. Cases are chosen for structure and cooling, which cannot be retrofitted; connectivity can, cheaply and well. The exception is the household whose case sits in another room or a cupboard by design — there, the hub is not a workaround but the plan, and it should be bought with the case rather than discovered after it.
Do white cases yellow or age worse than black ones?
The steel and paint age similarly; what differs is visibility. White shows dust as grey and grime as beige, black shows dust as pale frosting and scratches as silver — each colour displays a different sin. Quality painted finishes resist yellowing well; the yellowing stories mostly concern older plastics and heavy sunlight, which a window-side placement supplies generously. Choose the colour for the room and your cleaning temperament, keep the case out of direct sun if it is white, and the ageing argument largely evaporates.
Can a case be too big for good airflow?
A case can be too empty for tidy airflow, which is the real form of the question. Air follows the path the fans give it, and in a large, sparsely filled case that path can wander, pool in dead zones, or short-circuit from intake to exhaust without visiting the components. The cures are the usual ones — deliberate fan placement, directed intake toward the graphics card, and not mistaking volume for ventilation. Size itself is not the sin; an unplanned path is, at any size, which is why the airflow setup method matters more than the case’s litres.
Should I choose a case with a solid front if I rarely stress my PC?
You can, and for a light-duty machine — browsing, office work, media — the thermal penalty of a solid front may never appear in practice, because the components simply do not produce enough heat to expose it. The honest test is your worst hour, not your average one: a summer afternoon’s long video call with everything running is a fair rehearsal. If temperatures stay comfortable there, the quiet and the clean look of a solid front are legitimately yours. If the worst hour is a rendering or gaming session, the solid front’s bill arrives exactly then, and mesh earns its place.
How many drive bays do I actually need in a modern build?
Fewer than cases assume. Most current builds live entirely on motherboard-mounted solid-state drives, which need no bays at all, with perhaps one large mechanical drive for bulk storage and backups. That reality frees the front of the case for airflow, which is why so many modern designs deleted the bay stack. Count your actual drives, add one for the backup drive you should own, and treat every bay beyond that as space you are lending to a past decade. If your work genuinely moves terabytes — video archives, media libraries — the calculus reverses, and a case with real bay capacity becomes a specialist tool worth choosing deliberately.
Does a case need tool-less panels and fittings to be good?
No, but it needs honest ones. Tool-less mechanisms are a convenience that varies from delightful to fragile, and a conventional thumbscrew that will work for twenty years beats a clever latch that works for two. Judge the fittings by their second hundred uses, not their first: metal threads over plastic clips for anything you will open monthly, and captive designs wherever a dropped screw would fall into the power supply. Convenience features earn their place when they survive the ownership, not when they impress at the unboxing.
Should I buy the case before the other components?
Buy it after the motherboard, graphics card, and cooler are decided, because the case’s job is to fit them — but buy it before the power supply if the supply’s length or cable reach depends on the case’s size. The safe order is: components that dictate dimensions first, the case that must contain them second, and everything flexible last.
Is a heavier case a better case?
Heavier usually means thicker steel and more material, which correlates with rigidity and quieter panels — but weight also comes from glass, and glass adds kilos without adding structure. Judge rigidity by flexing a panel and listening to it, not by the shipping weight.
The Bottom Line
Choose a case by checklist, not by photograph: board size, the three clearances, an airflow path you can complete with its fan mounts, filters you will actually clean, and routing room behind the tray. Compatibility first, cooling second, build experience third, looks last — in that order, the case disappears into a machine that just works.
Related Guides
Size the case against its rivals, plan its airflow, and browse cooling-focused roundups: