Knowing how to set up a Wi-Fi extender properly is the difference between a dead zone fixed in fifteen minutes and an evening of frustration. The process itself is simple — plug the extender in near the router, connect it to your network using WPS or the maker’s app, then move it to a halfway position and test — but the order matters, and most failed installations skip the same two steps: configuring the unit while it is still close to the router, and verifying the new network from the actual dead zone rather than from the hallway.
This guide covers all three setup methods (WPS button, phone app and web browser), explains the choices you will meet along the way — network names, bands, passwords — and finishes with the testing routine that tells you whether the installation actually worked. If you have not bought the extender yet, start with How to Choose a Wi-Fi Extender; if yours is already in hand, work through the steps below in order and do not skip the final verification, because an extender can appear to work while quietly making a room slower.
Disclosure: As an Amazon Associate, ilcastellomenu.com earns from qualifying purchases. If you buy through a link on this page, we may earn a commission at no extra cost to you. Product details and availability change over time, so check the current listing before you buy.
What you need before you start
- The extender, unboxed, with its power supply or prongs ready.
- Your router’s Wi-Fi network name (SSID) and password, written down exactly — setup fails most often on a mistyped password.
- A phone, tablet or laptop with Wi-Fi for the app or browser method.
- Your router within reach for the WPS method, since you will press buttons on both devices within a short window.
- A speed-test app or website you trust, for before-and-after measurements.
- Fifteen unhurried minutes — rushing placement is how extenders end up in the wrong room permanently.
One preparation step pays for itself: before touching the extender, stand in the problem room and run a baseline speed test on the router’s network, then screenshot or note the result. You will repeat the test at the end, and having honest before numbers stops you from declaring victory over a placebo. Readers whose problem room is a streaming den can compare their targets with the expectations in Best Wi-Fi Extenders for Streaming.
In this guide
Step 1: Configure the extender next to the router
Plug the extender into an outlet in the same room as the router, ideally within a few feet, and wait for its power light to settle — most units need a minute or two to boot. Resist the temptation to install it straight into the far room. Every setup method works more reliably with a strong signal, and a failed first configuration is much easier to retry when both devices are in front of you. If the extender was used before or a previous attempt half-configured it, clear it first using the procedure in How to Reset a Wi-Fi Extender so you start from factory state.
While it boots, decide on your network name strategy. Most extenders offer two options: clone the router’s name (sometimes automatic in mesh-style systems) or create an extended name, traditionally the original with _EXT or _5GEXT added. Cloning is more convenient — devices choose the stronger signal themselves — but separate names give you control and make troubleshooting clearer, because you always know which device you are connected to. For a first installation, separate names are easier to verify; you can switch to a single name later once everything works.
How to set up a Wi-Fi extender with WPS, an app or a browser
Method A: the WPS button (fastest)
Press the WPS button on your router, then within about two minutes press the WPS button on the extender. Watch the indicator lights: most extenders show a solid or green link light when the connection succeeds, and many repeat the process for the second band automatically or ask you to press WPS again for 5 GHz. WPS is quick but gives you the least control over names and settings, and a few routers ship with WPS disabled for security — if the lights never settle, move to the app method rather than pressing buttons repeatedly.
Method B: the maker’s app (recommended)
Install the extender brand’s app (TP-Link Tether, NETGEAR Nighthawk and similar), create or sign in to the account it requests, and let it discover the extender’s temporary setup network. The app walks you through selecting your router’s network, entering its password, choosing names for the extended networks and placing the unit — many apps include a signal meter for the final position. This is the method most people should use: it shows the link quality numerically instead of leaving you to interpret blinking lights.
Method C: a web browser (most control)
Connect a laptop to the extender’s temporary network (its name and any default password are printed on the unit’s label), then open the setup address from the quick-start guide — typically a local name such as the brand’s setup domain or a numeric address. The wizard mirrors the app’s steps but exposes extras: manual channel choices, access point mode, and firmware information. Choose this method if the app misbehaves or if you intend to fine-tune settings immediately.
Step 2: Move the extender to its working position
Once configuration succeeds, unplug the extender and carry it to the halfway point between the router and the dead zone — a spot that still has a solid router signal of its own. Placement is a subject in itself, covered fully in How to Position a Wi-Fi Extender, but the essentials are: choose an outlet at roughly waist-to-counter height, in the open rather than behind furniture, and use the extender’s signal indicator or app meter to confirm the link is in the good zone — usually shown green. A red or amber reading means move it closer to the router, even if that feels counter-intuitive; an extender repeating a weak signal helps nobody.
Plug-style extenders occupy an outlet, and in many homes they block the second socket or sit awkwardly behind a sofa leg. Note the practical details now — whether the unit runs warm against a curtain, whether its bulk blocks the neighbouring socket, whether a pass-through outlet would matter — because living with the installation is part of setting it up. Give the unit two full minutes after moving before judging anything; it needs to boot, reconnect and renegotiate with the router.
Step 3: Connect your devices and test honestly
- In the dead room, open Wi-Fi settings on your phone and confirm the extended network appears with strong bars.
- Join it, then run the same speed test you used for the baseline, in the same spot, holding the phone the same way.
- Test the second band too if you created separate names — 5 GHz should be faster at this range, 2.4 GHz more forgiving.
- Walk a streaming device or laptop through its real job: play a video, join a test call, load a heavy page.
- Check the wired port if you plan to use it: plug in the television or console and confirm it reports a connection.
- Finally, test from one room beyond the dead zone if relevant — extenders sometimes overshoot helpfully.
Compare with the baseline. A successful install turns an unusable room into a workable one; expect a meaningful fraction of router-side speed, not all of it, for the reasons explained in Do Wi-Fi Extenders Slow Down Internet. If the extended network is slower than the weak router signal was, the extender is too far from the router — move it one outlet closer and retest. Two or three candidate positions, tested honestly, is a normal and worthwhile ritual.
Settings worth changing right after setup
- Firmware: check for an update during setup, not months later — the full routine is in How to Update Firmware on a Wi-Fi Extender.
- Admin password: change the extender’s own management password from its default if the setup wizard did not force you to.
- LED control: many units can dim or schedule their lights — worth it for bedroom installations.
- Band steering or a single combined name: enable it once you trust the setup, if you prefer devices to sort themselves out.
- A note in your phone: record the extender’s model, admin login location and the outlet it lives in. Future-you, troubleshooting at midnight, will be grateful.
If setup simply will not complete — the extender never sees the router, or the wizard loops — do not keep retrying the same way. Power-cycle both devices, try a different setup method, and if a band refuses to connect, configure the 2.4 GHz band first and add 5 GHz afterwards. Persistent failure on a brand-new unit, configured next to the router, is a legitimate reason to exchange it.
The short version
Configure beside the router, choose your network names deliberately, move the unit halfway with a confirmed good link light, then test from the dead room against your baseline. That sequence — not any particular brand’s wizard — is what makes an installation succeed. And when the extender later misbehaves, the same order applies in miniature: check position, check the link light, then reach for the reset and firmware guides rather than buying a replacement on suspicion.
Setting up with a provider router or gateway
Most extenders spend their lives repeating a provider-supplied gateway, and these combinations have their own folklore. Provider gateways often arrive with band steering enabled under a single network name, which most extenders handle fine — but if setup stalls or one band never appears, temporarily splitting the gateway’s 2.4 GHz and 5 GHz names, completing the extender setup against the separated names, and then re-combining is a reliable workaround. Provider gateways also tend to place their WPS button in software (an app or a web page) rather than on the box; if you cannot find a physical button, that is where it lives.
A second provider quirk: some gateways reserve their own mesh ecosystem and gently discourage foreign extenders, usually by steering clients oddly rather than by outright refusal. The extender will still work; if roaming behaves strangely, using a distinct extended network name and letting devices be manually switched is the pragmatic peace treaty. And if the gateway is a combined modem-router standing in for an old separate modem, remember the extender only ever talks to the router half — nothing in this guide changes.
Names, passwords and security choices during setup
Setup is when your network’s naming and security get decided, often by default and in a hurry. Slow down for three choices. First, the extended network’s name: matching the router exactly is convenient and works well with modern devices; a suffixed name is uglier and more debuggable. Households that troubleshoot often — gamers, home workers — tend to end up preferring the suffix after their first midnight incident, because knowing which box you are connected to is half of every diagnosis.
Second, the password: the extended network should use the same strong password as the router’s, not a simpler one because ‘it is only the extender’. It is the same network and the same front door. Third, the extender’s own admin password, which protects its settings page: change it from the default during setup and store it with the router’s credentials. An extender with a default admin password on a home network is a small but real hole, and setup day is the one day you are guaranteed to be looking at the screen where it gets fixed.
Special cases: separate bands, access point mode, and a second extender
Some households deliberately configure the extender’s bands asymmetrically: extend only the 5 GHz network for a nearby streaming room, leaving 2.4 GHz devices to reach the router directly, or extend only 2.4 GHz to shepherd distant smart devices while nearer devices use the router’s 5 GHz. Both are legitimate, and the setup wizards allow them — deselect the band you do not want rather than configuring both by habit. Asymmetric setups are also a tidy fix when one band’s path is hopeless: a 5 GHz link that cannot cross the house should not be configured to try.
Access point mode is the other special case hiding in the same wizard: if a cable already reaches the extender’s room, choosing AP mode during setup converts the unit into a wired-fed broadcaster at full speed — the architecture compared in wifi extender vs access point. Finally, a second extender: set it up exactly as the first, beside the router, and position it to repeat the router — never to repeat the first extender. Daisy-chaining is the one arrangement every maker’s support line will ask you to undo.
After setup: the room-by-room verification tour
Setup wizards declare success too early; the verification tour is where installation actually finishes. Walk the home with a phone and a short list. In each room, note which network the phone has chosen and run one quick load — a heavy page or a few seconds of video. You are hunting for two things: rooms where the phone clings to the router’s dying signal instead of the strong extended one (the sticky-client pattern, cured by toggling Wi-Fi once so the device learns, or by matching network names if it persists), and rooms where the extended signal is present but slow, which marks the extender’s true working edge more honestly than any coverage claim.
Include the unglamorous stations on the tour: the smart TV (does it see the extended network and hold a stream at the busy hour?), any wired device on the extender’s port (does it report a gigabit or a slower link, and does it survive the extender’s reboot?), the printer and other shared devices (visible from both networks?), and the far garden or garage point if that motivated the purchase. Test the guest arrangement too if visitors will use it — some extenders pass the guest network through, some do not, and discovering this when a guest arrives is a small social failure.
Finish the tour by writing the installation down: extender model, outlet, network names, where the admin password lives, and the date. Stick it in the same note as the router’s details. Installations documented this way get troubleshot in minutes years later; undocumented ones get factory-reset on suspicion, which is the hobbyist equivalent of turning it off and on again. The tour takes twenty minutes on setup day and repays them at the first incident, which is the closest thing networking offers to a guaranteed return.
Setup-day mistakes that only appear a week later
Some setup errors are patient. The extender configured against the router’s 5 GHz network only, in a spot where 5 GHz was strong that afternoon and is marginal on rainy evenings, works beautifully for a week of anecdotes before the pattern emerges. The password typed correctly for the extended network but with the router’s guest network selected as host — everything ‘works’, except the extended devices cannot see the printer or the NAS, a mystery that surfaces the first time someone tries to print. The unit left in its temporary near-router position ‘just for tonight’ becomes, by the physics of household inertia, permanent — and the dead zone’s residents conclude that extenders do not work.
The defence is the verification tour plus one delayed check: revisit the installation after a week of real life, at the busy hour, and re-run the far room’s tests. Compare against setup day’s numbers while you still remember them. A week is long enough for marginal links, sticky devices and mis-selected host networks to confess, and short enough that the setup screens are still familiar. Households that schedule this single follow-up convert most ‘extenders are flaky’ stories into one adjusted outlet or one corrected checkbox.
There is a social mistake in the same family: setting up the extender while the house’s heaviest user is away, then declaring victory. The gaming teenager, the partner on video calls all day, the camera that uploads all night — each is a load the installation must survive, and their absence during testing is a false negative factory. If the real workload cannot be present on setup day, the week-later check is not optional; it is the actual test, and setup day was only the rehearsal.
Gear mentioned in this guide
These are examples from the product classes this guide discusses. Every model below was checked against the Amazon Creators API product pool for this site, and the link goes to the exact listing that was verified.
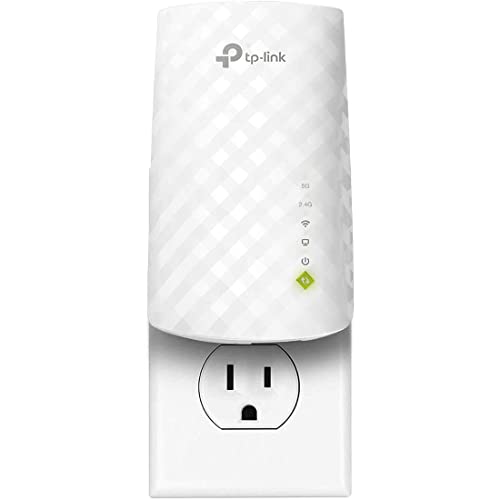
TP-Link RE220 — app-guided setup done well
The RE220 sets up through TP-Link’s Tether app, which shows the host signal strength numerically during placement — the feature that matters most in this guide. Its Ethernet port also lets you verify the wired side of the installation with a laptop before committing a TV or console to it.
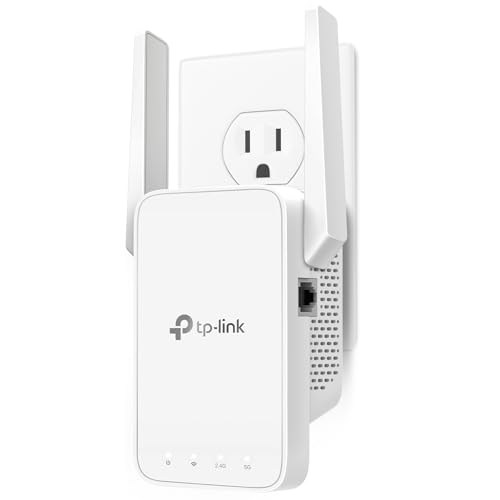
TP-Link RE315 — a step up in speed class
The AC1200-class RE315 follows the same app process with more headroom for streaming rooms, plus EasyMesh compatibility for routers that support it. A good example of how setup experience, not raw class numbers, is what you actually live with.
Setting up when the router lives somewhere awkward
The standard setup sequence assumes you can stand next to the router with the extender in your hand, and in many homes you cannot. Routers hide behind TVs, sit in under-stairs cupboards, live in a hallway cabinet with the fibre termination, or perch in a landlord’s locked utility area. The method adapts without changing its logic. Configuration still happens with the extender close to the router, because pairing is a conversation the two devices need to have clearly; it just may mean configuring the extender on an extension lead in the cupboard doorway, or on the nearest socket to the router’s hiding place, rather than on a convenient kitchen worktop. What matters is the strength of the signal between the two devices during pairing, not the comfort of the person doing it.
If the router is genuinely inaccessible — a provider gateway in a sealed housing unit, a landlord-managed router you may not touch — lean on the methods that need nothing from the router except its network name and password. App and browser setup both work this way: the extender broadcasts its own temporary setup network, you join it, and you tell the extender which home network to repeat and what its password is. WPS is the only route that truly needs physical access to the router’s button, so treat it as a bonus rather than the plan. In student housing and shared flats this is also the polite method, because it changes nothing on the shared router that housemates depend on.
Awkward router positions also change where the finished extender should go. A router in a corner cupboard radiates unevenly, strong toward the open side of the house and feeble through the cupboard’s own walls. During setup, note which direction the signal escapes best by walking with your phone before you move the extender: the working position wants to sit in that strong direction, roughly halfway to the weak room. Ten minutes of walking at setup time prevents the classic error of placing the extender in a geometrically perfect halfway spot that happens to be in the router’s shadow.
What each setup screen is really asking, field by field
Setup wizards look simple, but each field hides a decision worth understanding. The network selection list shows every network the extender can hear, often including neighbours’ routers with similar names. Picking the wrong one is more common than any hardware fault, especially with provider routers whose default names differ by a single character between households. Check the exact name against the label on your router, and if two entries look alike, the one with the far stronger signal at the setup position is almost certainly yours.
The password field asks for the router’s Wi-Fi password, not the admin password printed beside it and not your provider account password. Labels typically carry several strings — a Wi-Fi key, a WPS PIN, an admin password and a serial number — and setup fails silently when the wrong one is typed. If the wizard keeps rejecting a password you are sure is right, check for the classic transcription traps: capital O versus zero, lowercase L versus the digit one, and a trailing space pasted in from a password manager. Retyping by hand, character by character, fixes a surprising share of failed setups.
Region and channel questions appear in browser-based setup. Region matters because it sets which channels and power levels the extender may legally use; choose your actual country rather than the default, or the extender may avoid channels your router is using and perform oddly. Channel choices, where offered, are best left on automatic for a first setup. Manual channel selection is a tuning tool for later, once you know the installation works; changing it during setup adds a variable you do not need while you are still proving the basics.
Firmware prompts during setup deserve a yes, with one condition. If the wizard offers an update before configuration, accept it while the extender is still beside the router on a strong link, and do not unplug anything until it restarts by itself. Updating at this moment means the device you place in the hallway runs current software from its first hour, and any setup quirks fixed since manufacture never get a chance to confuse you. The fuller background on versions and update routes is covered in the guide to updating extender firmware.
Setting up for other people: parents, tenants and the guest room problem
Setting up an extender in someone else’s home adds a requirement your own setup never faces: the result must survive without you. Choose the simplest naming scheme — the same network name as the router where the model supports it cleanly — because instructions like “connect to the one ending in EXT when you are upstairs” are forgotten within a week. Write the extender’s admin password and the setup method you used on a card that stays with the router. Note which socket the extender occupies and why, because the most common support call, months later, begins with someone unplugging it to charge a phone or plug in a vacuum cleaner and returning it to a different, worse socket.
Before you leave, test with the resident’s own devices, not yours. Their older tablet, their phone, the TV they actually watch — these are the clients that must roam and reconnect happily. Walk the home with them, show them the extender’s status light and what its normal colour looks like, and agree on the one permitted remedy: unplug, wait half a minute, plug back into the same socket. Everything beyond that waits for a visit or a call. An extender set up with this kind of handover in mind quietly works for years; one left as a mystery box gets unplugged at the first confusion and the dead zone returns.
For a guest room or a rental property you manage, consider the opposite naming choice: a distinct extended network name can be a feature, because guests can be told exactly which network suits the far rooms, and their devices will not cling to a fading router signal in the bedroom. Note the arrangement in whatever instructions guests receive, alongside the password, so the extender earns its keep instead of puzzling visitors.
The wired setup variations: Ethernet backhaul and access point mode
Some setups should involve a cable from the start. If your home already has Ethernet running to the weak area — a wired study, a media cupboard, a socket installed for a TV — many extenders can be configured in access point mode instead of repeating mode. The distinction matters: in repeating mode the extender receives and retransmits wirelessly and pays the usual speed cost; in access point mode it receives everything by wire and only transmits, delivering close to full router speed in the far room. Setup follows the same app or browser path with one extra choice, the operating mode, plus a cable run to test before you commit to tidying it away. The comparison of extender versus access point elsewhere in this guide cluster explains when that wired route is worth pursuing.
A second wired variation helps even in repeating mode. Some extenders let a fixed device — a desktop PC, a console, a TV — plug into the extender’s Ethernet port while the extender links wirelessly to the router. Configure this after the wireless setup is proven, not during it: get the extended network working, move the extender to its position, confirm the status light shows a good router link, and only then cable the TV or PC in and switch that device to its wired connection. Devices configured this way stop competing for wireless airtime in the far room, which quietly improves things for the phones and tablets still using Wi-Fi there.
If you are setting up two extenders in one larger home, sequence matters. Configure and position the first one completely, test it for a day, and only then set up the second, connecting it to the router’s network — never to the first extender’s network. Chaining extenders stacks the speed penalty and creates roaming confusion that is hard to unpick later. Homes that genuinely need coverage in several directions are also the homes where the mesh alternative deserves a look before a second extender is bought, and the setup effort you save by deciding early is considerable. For product options suited to bigger properties, see the roundup of best Wi-Fi extenders for large homes.
A calm troubleshooting ladder for setup day itself
When setup stalls, the temptation is to restart everything at random. A short ladder works better. First, prove the extender is awake and in setup mode: its lights should show the pattern the manual describes for a fresh or reset unit, and its temporary setup network should appear in your phone’s Wi-Fi list. If the setup network never appears, the unit is either still configured from a previous attempt — reset it and begin again — or faulty in a way no wizard will fix. Second, prove you are talking to the extender and not to the router: during configuration your phone must stay joined to the extender’s setup network, and many phones helpfully abandon it because it has no internet. Switch off the phone’s mobile data and any auto-switch-to-better-network feature for the duration of setup; this single step rescues more failed installations than any other.
Third, separate pairing failure from placement failure. If the extender configures beside the router but fails in its working position, the position is beyond a usable link — move it one room closer and test again rather than reconfiguring from scratch. If it will not configure even beside the router, the problem is credentials, method or the unit itself: re-enter the password by hand, try the browser route instead of the app, and only then suspect hardware. Fourth, change one thing at a time and note what you changed. Setup problems feel chaotic precisely because several unknowns stack up; the ladder removes them in the order that costs the least time. Keep the router’s label photographed on your phone throughout — every credential you need is on it, and setup day is no time to be moving furniture to read it again.
Setup in a home office that cannot afford downtime
When the weak room is a working office, setup stops being a casual weekend task and becomes a small change-management exercise. Schedule the work outside meeting hours, and tell anyone who depends on the connection what you are doing, because the extender’s configuration involves the router link dropping and reconnecting several times even though the router itself never restarts. Keep a fallback ready: a phone hotspot for one urgent call, or a long Ethernet cable trailed temporarily to the router, means a stubborn setup never becomes a missed deadline. That safety net also removes the pressure that causes rushed mistakes, such as accepting the first working configuration instead of the right one.
Sequence the office setup in two passes. The first pass, done beside the router, covers pairing, firmware and naming, and ends with the extender proven on your own laptop. The second pass, in the office doorway or the hallway outside it, covers placement and verification with the actual work tools: join a test video call from the desk chair, move a large file to wherever your work stores it, and make a Wi-Fi call while walking to the farthest corner you use. Only when those pass should the extender’s position be treated as final and the cable tidied or the socket’s usual contents rearranged around it. Splitting setup this way means a placement problem never sends you back to re-pairing, and a pairing problem is solved at the router rather than at arm’s length in a doorway.
Document the finished setup as you would any work equipment. Save a note with the extender’s model, its admin password, the setup method used, the socket it occupies and the date its firmware was updated. Store the router’s label photo with it. If the connection degrades months later, that note turns a vague complaint into a quick comparison: has the firmware changed, has the furniture moved, has a new neighbouring network appeared? Offices that keep this small record fix later problems in minutes; offices that rely on memory repeat the whole setup from scratch.
Finally, plan the maintenance rhythm at setup time, because an office extender that is forgotten will eventually announce itself at the worst moment. Put a twice-yearly reminder in the calendar to check for firmware updates and to glance at the status light and the app’s client list, which also reveals any device that has quietly latched onto the extender from another room and is performing badly for it. Revisit placement whenever the office layout changes — a metal filing cabinet or a new bookshelf between extender and router can undo a good installation without anything electronic changing at all. Readers setting up primarily for streaming or gaming rooms will find the placement logic expanded in the positioning guide, and those still deciding whether an extender is the right purchase at all should start with the choosing guide linked earlier in this article.
One setup habit pays off in every kind of home: photograph the finished installation. A quick picture of the extender in its socket, the status light showing its healthy colour and the router label gives you a reference that memory cannot match. When something changes months later — a light behaving differently, a socket repurposed, a password forgotten — the photographs answer the first questions immediately, and they make any request for help, whether to a family member, a housemate or a support line, dramatically more useful than a description typed from recollection.
Treat the first evening after setup as a shakedown, not a verdict. Networks reveal their weak moments under the household’s real peak load, when streaming, calls, downloads and smart devices all compete at once. If the extended room survives that evening comfortably, the setup is genuinely finished; if it merely survived an empty afternoon, keep the extender’s box and receipt handy and keep testing through a normal busy week before calling the job done.
Frequently asked questions
Why does my extender’s network have a different name?
By default many extenders append a suffix such as _EXT so you can tell the networks apart. You can usually rename the extended network to match the router exactly in the app or web settings; devices will then roam, though sometimes stickily. Mesh-ecosystem extenders clone the name automatically.
The WPS button did not work. What now?
Use the app or browser method instead — WPS is optional and is disabled on some routers. Also confirm you pressed WPS on the router first and the extender within the time window, and that both devices were in the same room during pairing.
Should I connect the extender to 2.4 GHz or 5 GHz?
Connect both if the extender is dual-band. The 5 GHz link is faster over short range; 2.4 GHz reaches further. The extender uses whichever host link you configure, and clients can then use either band on the extended side.
How long should setup take?
About ten to fifteen minutes including placement tests. Most of that time is booting and walking between rooms, not typing. If you pass forty minutes, stop, reset the unit and switch setup methods — something structural is wrong.
Can I set up an extender without a phone app?
Yes. The browser method works from any laptop connected to the extender’s temporary network, and WPS needs no screen at all. The app is a convenience, not a requirement.
My extender worked, then I moved furniture and it stopped. Why?
Large furniture, mirrors and appliances genuinely change radio paths. Re-run the placement test: check the link indicator in the current spot, and if it has dropped to amber or red, shift the extender an outlet in either direction and retest.
Can I set up an extender using only a laptop, with no phone at all?
Yes. Join the extender’s temporary setup network from the laptop’s Wi-Fi menu, then open the setup address given in the manual in a browser. The browser route offers the same options as the app, sometimes more. It is also the best fallback when an app refuses to install, demands an account you do not want, or cannot find the extender on its own.
Should I update the extender’s firmware before or after moving it to its position?
Before. Beside the router the link is strong and a power interruption is unlikely, which are exactly the conditions an update wants. Once the extender is in its hallway position the update can still be done, but a weak link during a large download is an unnecessary risk. The dedicated firmware guide walks through the routes and the verification step in detail.
My extender offers both a normal and a high-speed or cross-band mode. Which do I pick at setup?
Start with the normal mode, prove the installation, and live with it for a few days. Cross-band modes, which receive on one band and transmit on the other, can improve throughput in the right layout, but they also make behaviour harder to predict while you are still learning your home’s signal patterns. Switch later, one setting at a time, and keep it only if your usual tasks measurably improve.
The setup finished but only some of my devices can see the extended network. Why?
Usually a band mismatch. Older devices that only support 2.4 GHz cannot see a 5 GHz extended network, and some extenders let you name the two bands separately or disable one. Check in the app that both bands are enabled and broadcasting, and confirm the struggling device’s capabilities before suspecting the extender. A device that connects happily beside the router on 2.4 GHz and never sees the extender is telling you which band it needs.
Do I need to set up the extender again after a power cut or after unplugging it?
No. A configured extender remembers its settings through power loss and reconnects to the router by itself when power returns, typically within a few minutes. Re-setup is only needed after a factory reset, a change to the router’s network name or password, or a move to a different router. If yours forgets its configuration after every outage, that behaviour itself points to a faulty unit.
Related Guides
Keep going with these guides and roundups from the same networking cluster: